
-
KanBo Installation
- KanBo Installation on Office 365 and Azure (Manual)
- KanBo Installation on Office 365 and Azure (KanBo Installer)
- KanBo On-Premises Installation Requirements and Prerequisites
- KanBo Installation On-Premise SharePoint 2013/2016/2019
- Creating and Updating the Elastic Cloud Deployment
- Creating a Linux Based Virtual Machine on Azure for Elastic Search
- Installing and Configuring Elastic Search on Debian
- Creating a Windows Virtual Machine on Azure for Elastic Search
- Installing and Configuring Elastic Search on Windows
- How to Create a X.509 High-Trust Certificate
- KanBo Setup
- KanBo Modern Webpart Installation
- Uninstall KanBo from Office 365
- Supported Browsers
-
KanBo Updates
-
Additional Components
- Setting Up KanBo Email Notifications on Azure
- Setting Up KanBo Email Notifications (On-Premise)
- KanBo Outlook Add-in Installation (O365 & On-Premise)
- Send Email to KanBo - Installation (Cloud)
- Send Email to KanBo - Installation (On-Premise)
- Enabling Email a Card Message
- KanBo and Microsoft Power Automate integration: Installation
- KanBo and Microsoft Power Automate Integration: Activation
- Configuring Power Automate with Your KanBo
- Installation of KanBo MyBoard Synchronization with Outlook Calendar and Outlook Tasks
- Installation of the Autodesk BIM Plugin for KanBo
- KanBo and UiPath Integration: Configuration
- Nintex Integration Installation
- KanBo API for Developers
- KanBo External User Groups (Active Directory Integration)
- KanBo Mini Application Installation
- Plugin for Adding Users to KanBo / Sharepoint When They First Enter it
- SharePoint Profiles Synchronization
- SharePoint Site Collection Balancing and Admin Warnings
- Sync Targets
- Installation of the KanBo Teams App
- Show all articles ( 1 ) Collapse Articles
-
Tips & Tricks
- Configure How Documents Should Be Opened from KanBo
- Customize KanBo Background Images and KanBo Colors
- Define Board Features to Be Enabled or Disabled by Default
- Disable Sleeping Tabs in Browsers
- Disable/Enable Public Boards Creation
- Find Out the Certificate Expiration Dates On-Premise
- Get KanBo ID
- How to Change the Help URL in Your KanBo
- Import Users to KanBo
- Renew Certificate for KanBo Graph Installation
- Show KanBo Version
- Removing syncing of profile pictures in the Profile Sync job
-
Troubleshooting
KanBo Installation On-Premise SharePoint 2013/2016/2019
1. Prerequisites
Important:
- You can see the prerequisites which need to be fulfilled for the KanBo On-Premise installation in the following article.
- Please request the latest KanBo Installation Files at support@kanboapp.com
You should choose the SharePoint Web Application where the most content (like Documents) is stored within your SharePoint Farm to create a new Site Collection from the Team Site Template inside of it. That way KanBo will be able to reuse most of your existing information without duplicating content.
2. Assumptions
For this installation example we are using the following:
- URL for KanBo will be like the following: https://kanbo.kdomain12.local
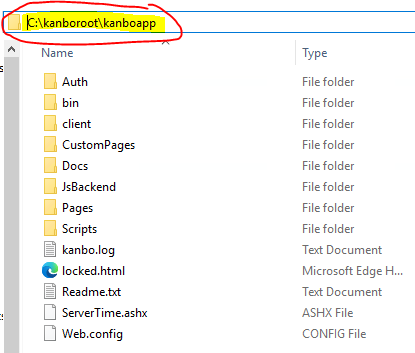
- Installation Directory for the KanBo Installation: “c:\kanboroot\kanboapp“
- IIS Site Name: kanboapp
- IIS App Pool Name: kanboapppool
- Hostname: kanbo.kdomain12.local
- SSL Certificate issued for: kanbo.kdomain12.local
- SharePoint Site Collection URL: https://portal.contoso.com
- SSL Certificate is already installed properly on the IIS where KanBo will be installed
3. Configure IIS
3.1 First, we need to create an App Pool in IIS, which will be connected then with the Site which will be created for KanBo- Open your Internet Information Services (IIS) Manager
- Right Click on Application Pools.
- Select Add Application Pool.
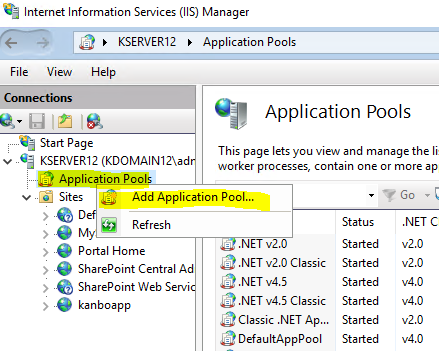
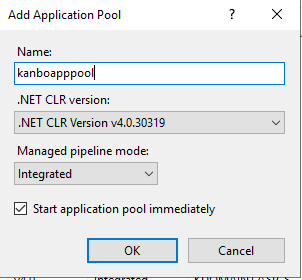
- Name the Application Pool “kanboapppool” and click OK.
3.2 Now we need to create a new Site to host the KanBo Installation
- In IIS Manager – Right Click on Sites.
- Select Add Website.
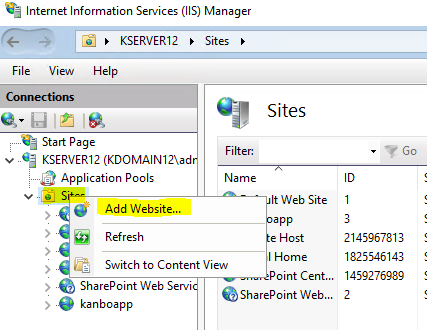
- Choose “kanboapp” as Site Name
- Choose the “kanboapppool” Application Pool
- Put the path where you want to have the KanBo Installation located (Here we are using “c:\kanboroot\kanboapp”)
- Choose “https”
- Put in your hostname (we are using “kanbo.kdomain12.local” in our example)
- Mark “Require Server Name Indication”
- Choose your SSL Certificate
- And click OK.

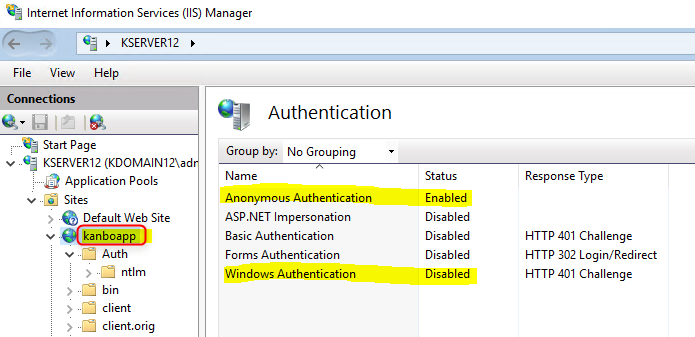
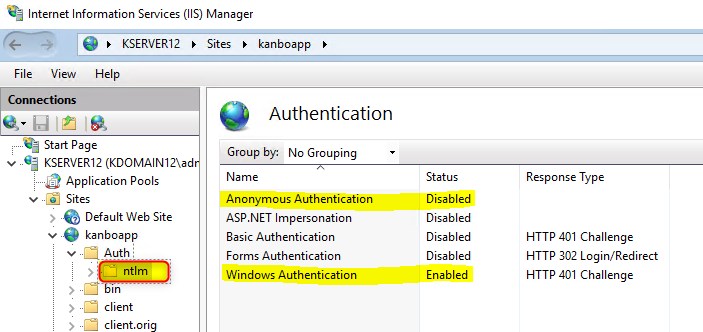
- In IIS Manager, click on your KanBo Site.
- Then Open on the right side Authentication.

- Configure – on the Site Level – as follows:
- Anonymous Authentication -> “Enabled”
- Windows Authentication -> “Disabled”
3.4 Now we need to configure also on the Site Level
- Click on your site (kanboapp) – Auth – ntlm
- On the right side click on Authentication.

- Configure – on the site level – as follows:
-
- Anonymous Authentication -> “Disabled”
- Windows Authentication -> “Enabled”
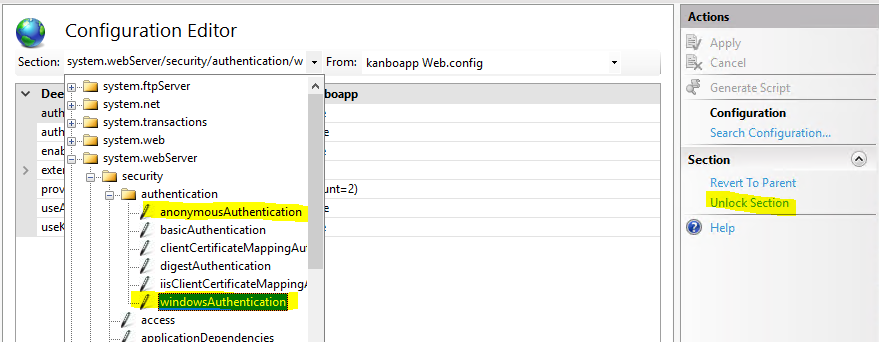
3.5 Last Step in IIS is to unlock Sections in Configuration Editor on both server and site level
- Click on your Server again.
- On the right side open the Configuration Editor.

- Now choose the Section System.webServer/security/authentication
- Click on “anonymousAuthentication” – then click on “Unlock Section” on the right side
- Then click on “windows Authentication” – then click on “Unlock Section” on the right side

- Then click on your Site “kanboapp” and on the right side open the Configuration Editor.

- Now choose again the Section System.webServer/security/authentication
- Click on “anonymousAuthentication” – then click on “Unlock Section” on the right side
- Then click on “windows Authentication” – then click on “Unlock Section” on the right side
neuer punkt 4 sitecollection erstellen – mit satz von oben plus erstellung von site collection beschreiben
4. Register a new App Identifier in SharePoint
To register a new App Identifier open the following link (replace the part in yellow with your own URL, where your SharePoint App Catalog is located):
https://portal.contoso.com/_layouts/15/appregnew.aspx
- Click on Generate Client id
- Click on Generate Client secret
- Fill in the Title: KanBo
- As App Domain, fill in: kanboapp.kdomain12.local
- As a redirect URL fill in: https://kanboapp.kdomain12.local
- And click on “Create”
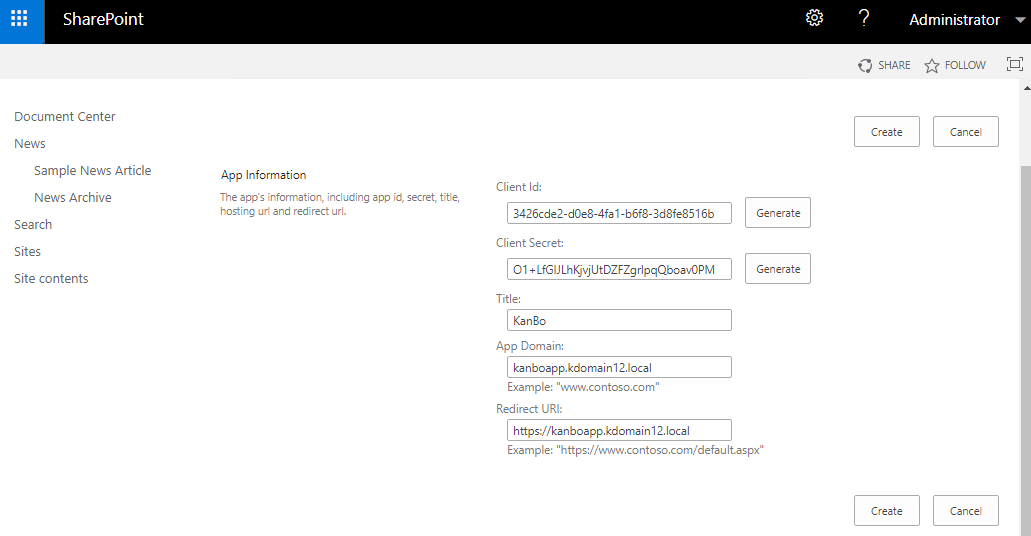
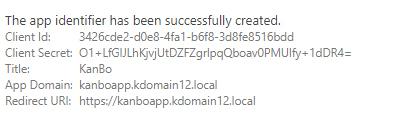
You will see a confirmation with details - Please save the results for later usage.
5. Set Permissions on the KanBo Installation directory
KanBo needs some additional permissions, therefore, please
- Add the following Users with read access to the KanBo Installation directory (here it is: c:\kanboroot\kanboapp\)
- “IIS_IUSRSUser”
- “Authenticated Users”
- “IIS APPPool\kanboapppool”
6. Register the (Self-Signed) Certificate in SharePoint
Please change the data in the brackets and run the script in Powershell Console:
Add-PSSnapin Microsoft.SharePoint.PowerShell
$publicCertPath = "[C:\location-to-your-certificate\kanbo-certificate.cer]"$certificate = New-Object System.Security.Cryptography.X509Certificates.X509Certificate2($publicCertPath)New-SPTrustedRootAuthority -Name "[kanbo-certificate.cer]"-Certificate $certificate $realm = Get-SPAuthenticationRealm $specificIssuerId = "[FEB88A0921B-AE9A-2256-9B466A5D4CD5F]"$fullIssuerIdentifier = $specificIssuerId + "@" + $realm New-SPTrustedSecurityTokenIssuer -Name "ContosoAppsHighTrust" -Certificate $certificate -RegisteredIssuerName $fullIssuerIdentifier -IsTrustBroker iisreset;7. Install KanBo
In this step we are going to install KanBo in the Site directory – which means to only copy/extract the files from the zip file to the KanBo Site directory, which you did choose in IIS (here we are using “c:\kanboroot\kanboapp\”) and then we need to configure the settings in the web.config file.
7.1 Extract the KanBo Installation Files from the zip file which has been provided to you into the root directory of your KanBo installation “c:\kanboroot\kanboapp\”
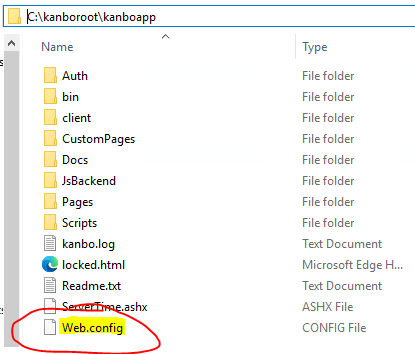
7.2 Configure the web.config
Please open the web.config file in an editor (it is located in the root of your KanBo site) and configure it as follows in the auth.sharepoint section
- Spaddress is http://portal.contoso.com/
- Clientid is the one from the step before
- Issuer id is registeredissuername – first part, only until @
- Thumbprint is thumbprint from wildcard cert
- Or path to pfx and password

- Enter Sql connectionstring (Preferable SQL Authentication)

8. Distribute the app in SharePoint
To be able to distribute the KanBo, we need to customize the file appmanifest.xml at first, therefore you need to do the following:
- Locate the file kanbo.app
- And just rename the file kanbo.app to kanbo.zip (only the extension needs to change to zip)
- Then open the kanbo.zip file and locate the file appmanifest.xml and copy it out of the zip file (choose any location on your PC)
- Then open the file appmanifest.xml (which you did extract before) in an editor and modify only the following parts:
- the Domain
- the ClientID
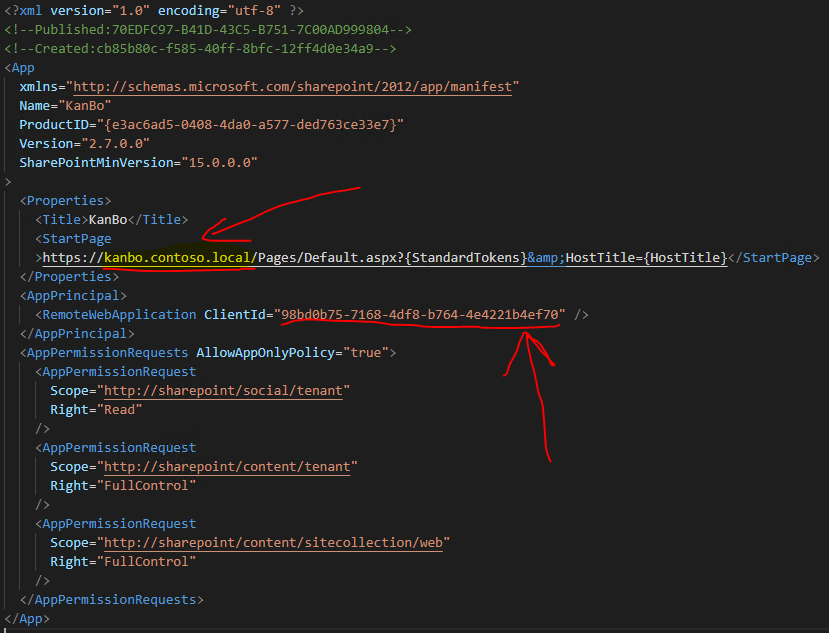
- After modifying, save the appmanifest.xml file
- Then just locate it in your explorer and drag and drop it to your kanbo.zip file
- You will be asked if you want to overwrite, plese confirm that and the file will be included in the zip file then correctly
- Then rename back again the file kanbo.zip to kanbo.app (again only change the extension from “zip” to “app”)
Now we are going to distribute the KanBo in SharePoint, which we will do in the App Catalog – you can go there like this
- Go to SharePoint Central Administration
- Click on “Apps” in the left menue
- Click on “manage app catalog”
- Click on the url which shows up from your app catalog (portal.contoso.com/sites/appcatalog)
- In your app Catalog Click “Distribute apps for sharepoint”
- Then click on “upload”
- Browse/Select the kanbo.app (which we prepared in the step before) and Click ok
- The app will be loaded and listed then
9. Add the app to SharePoint
After the KanBo is distributed in the SharePoint App Catalog, we can add it to our apps.
- Open your SharePoint Page, where you want to add KanBo (here we use: https://portal.contoso.com)
- Click on the top right on the gear Symbol and in the menue click on Add an app.

You will see a list of available applications, where also KanBo will show up.
- Click on KanBo – it will show that you cannot add this app here (which is because at first, you need to request the permission for this app)
- Click on Find out why.

- Click on Request approval.

- In the pop-up window click the Request button.
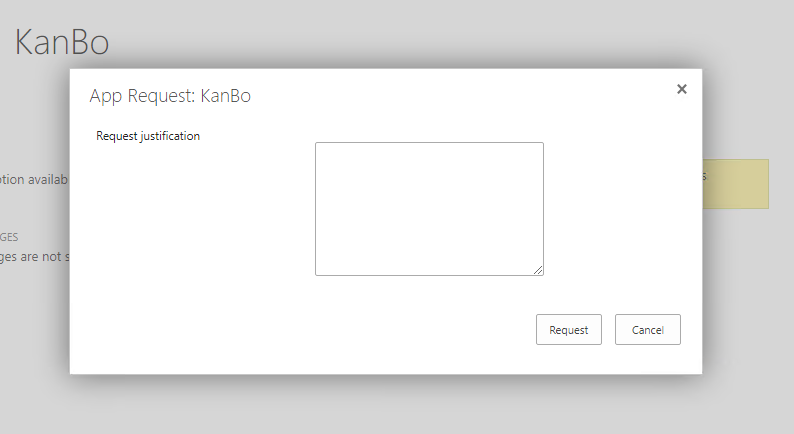
The App request is now pending (it will show you the pending permission).
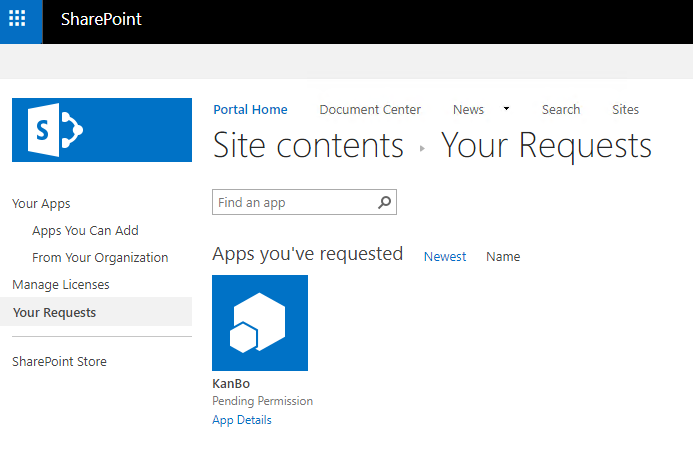
- Open your app catalog (here https://portal.contoso.com/sites/appcatalog).
- Click on the left side in the menu App Requests and it will show you the Permission Request from the KanBo.
- Then Click on the KanBo.
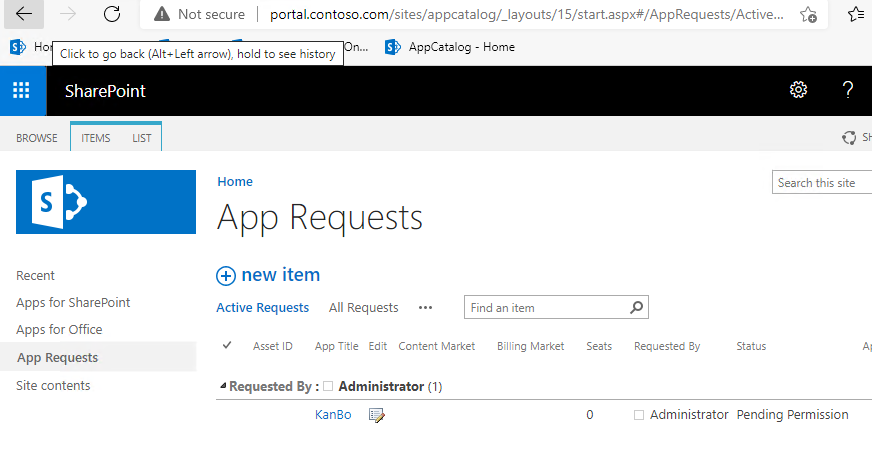
- In the next window, click on Approve.

The KanBo is now approved.
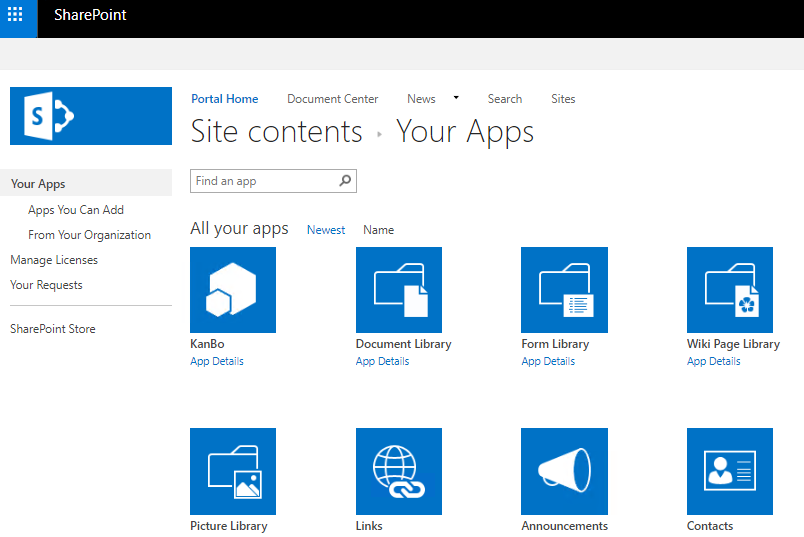
Now, as the KanBo did get the permission, we can install it.
- Therefore go back again to https://portal.contoso.com
- Click on the top right, on the gear symbol.
- Click on Add an app.
- Then click on the KanBo.
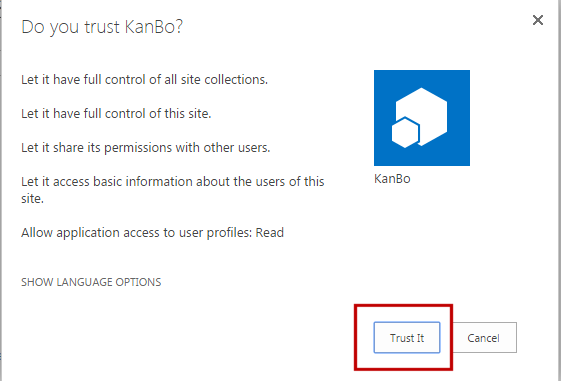
- And click then on Trust it.
10. Run KanBo Setup
Now we can run the KanBo Setup by opening the page: https://kanbo.kdomain12.local/setup and follow the steps from the setup instructions.
11. Configure KanBo Search
Install and configure Elastic Search, after which You will be establishing connection to it in KanBo.
Installation and configuration manual on Windows:
https://help.kanboapp.com/en/devops/installing-and-configuring-elastic-search-on-windows/
Installation and configuration manual on Linu (Debian):
https://help.kanboapp.com/en/devops/installing-and-configuring-elastic-search-on-debian/
Was this article helpful?
Please, contact us if you have any additional questions.