Installing and Configuring Elastic Search on Windows

- Run elasticsearch.bat
Important information to note, Elasticsearch configures the self-signed SSL certificate itself during the installation so it can use the HTTPS protocol.
- During the installation something like this should appear. Copy the generated password and the enrollment token to a notepad for later when we will connect the Elastic Search to Kibana.

- Do not close this command prompt for now, as it is running the Elastic Search service. We will install Elastic Search as a Service after we connect Elastic Search with KanBo.
2. Checking if Elastic Search is running
Check if you can access elastic by opening the following URL in the browser on your VM https://localhost:9200. There will be an error about an invalid certificate, but you do not have to worry about that for now as we will fix it later.
3. Connecting Elastic Search with Kibana
Kibana is the visual front-end for the Elastic Search. For now,
we will need Kibana to set up the search and configure a user that will be
used to connect KanBo to Elastic Search.
- Open a new Command Prompt window (a second one) and go to the /bin folder of Kibana.

- Run kibana.bat.
- After this message appears:
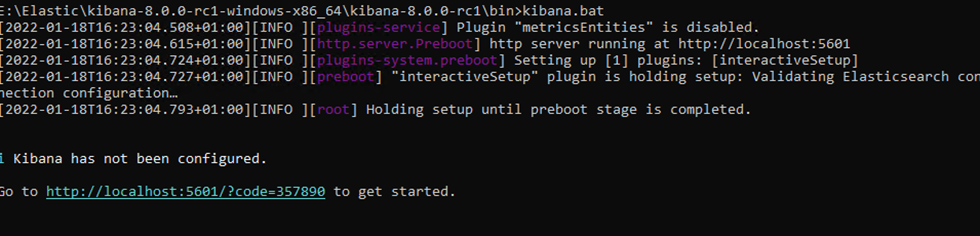
- Go to the url specified in the command prompt using your browser on your VM.
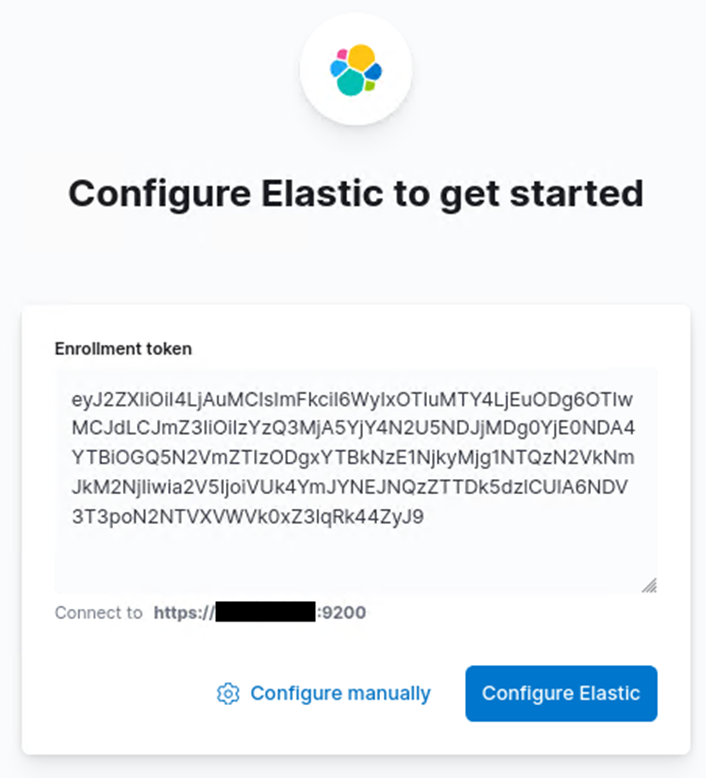
- Paste the enrollment token from your notepad inside the text field and click on “Configure Elastic”.
4. Creating a User for KanBo
By now, you should have two command prompt windows open, one that is running Kibana and one that is running Elastic Search. Please do not close those command prompt windows during the user configuration - you will need them later.
- Locate and open the web.config of your KanBo.
- Make sure You have this line in Your KanBo web.config: <elastic key=”55a42c0f7fc8e9444ba6e22370d8339c”/>, the key here is the encryption key and is a random String of min. 30 characters. This key will not be used anywhere in the configuration and is used to encrypt the communication between KanBo and elastic as additional layer of security.
- Save your web.config.
- Open Kibana in your browser by entering the URL from “Connecting Elastic Search with Kibana” step 3 and login with the username “elastic” and use the password of the Elastic build-in superuser from “Installing Elastic Search and the Elastic Kibana component”.
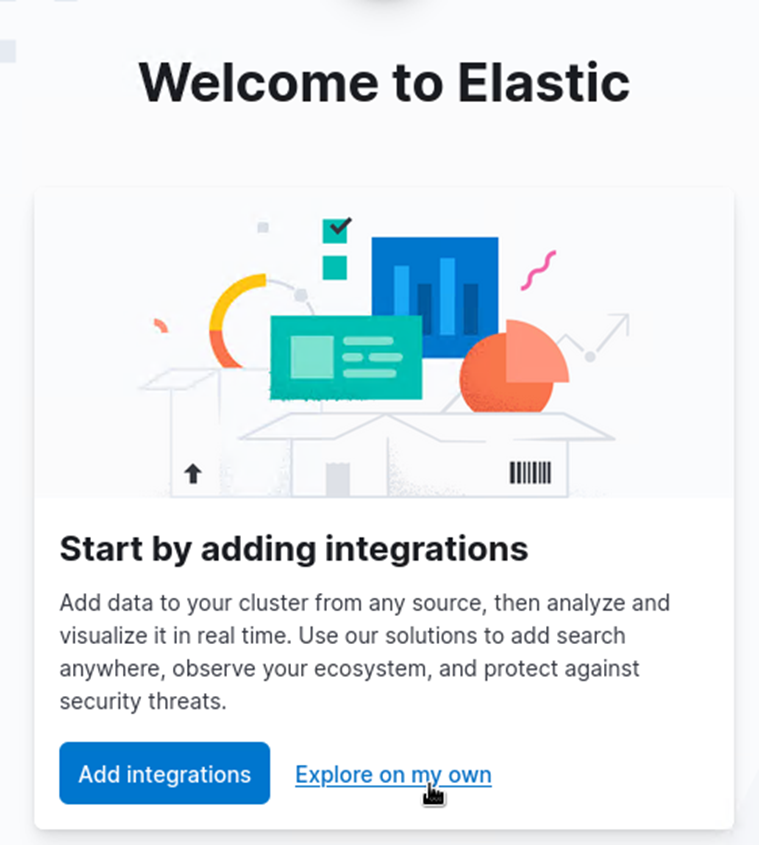
- When this window appears, click on “Explore on my own”.
- In the search bar at the top of the site, search for “Roles” and select it by “Go to”.
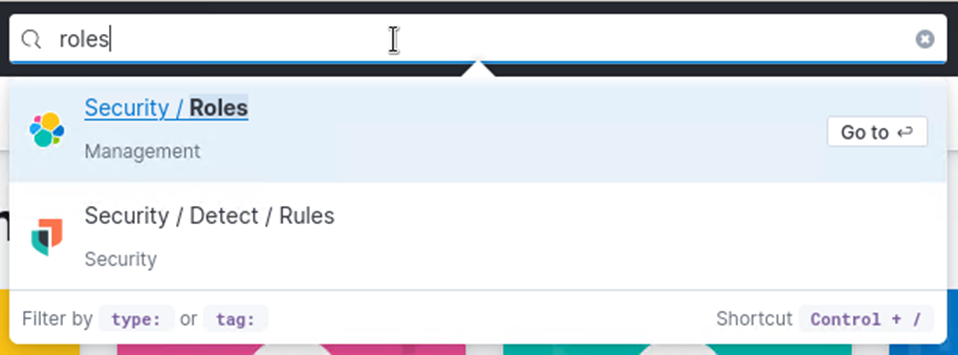
- Click on “Create role”.

- In role name, type “admin-KanBoSearch”.

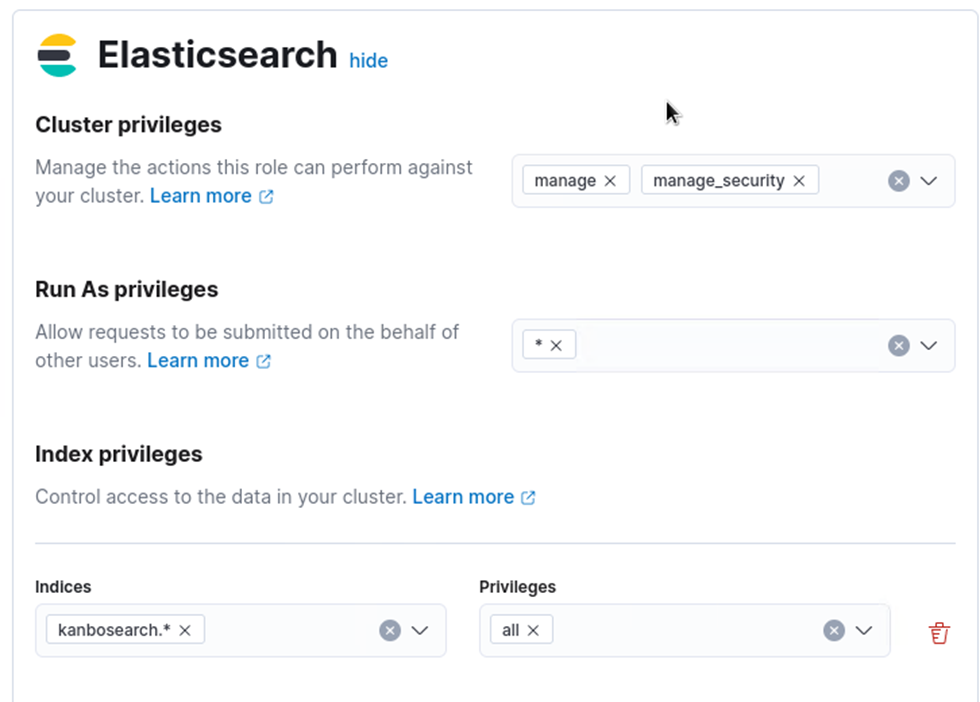
- Then configure these options the same way they are configured in the
screenshot.Cluster privileges: manage , manage_security
Run As privileges: *
Indices: kanbosearch.*
Privileges: all. - After creating a role, search for “Users” in the top bar and select “Go to”.

- And create a user in this fashion:
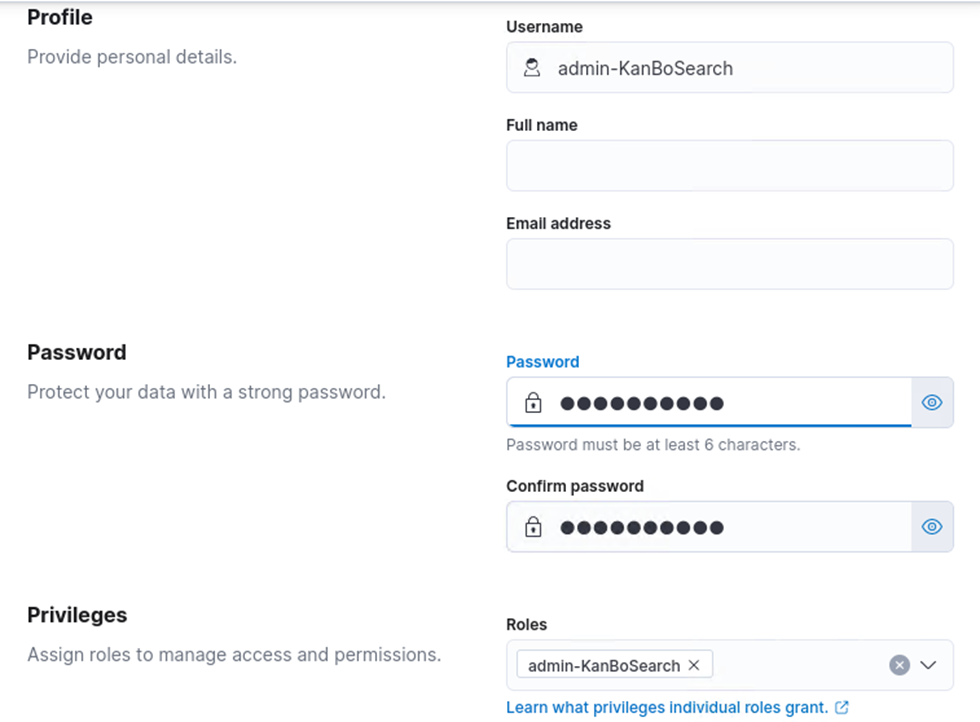
It is good practice to have the same username as the role name. The password is not generated and is set by you.
- For the “roles” section, select the role created in the step before: “admin-KanBoSearch”.
- From here, save the username and password somewhere for later.
5. Running Elastic Search as a service
After configuring the user we can safely stop the both services: Kibana and then Elastic Search that are running in our 2 open command line windows by using the combination of ctrl+c inside the command prompt windows. Please be aware, that Kibana has to be stopped before Elastic Search to avoid any issues.

And then typing in Y and confirming with enter

Which should result in the command prompt windows looking like this.
After you stopped both batch jobs:
1. In command prompt, go to Elastic Search /bin folder and run elasticsearch-service.bat install.

You have now an Elastic Search Service.
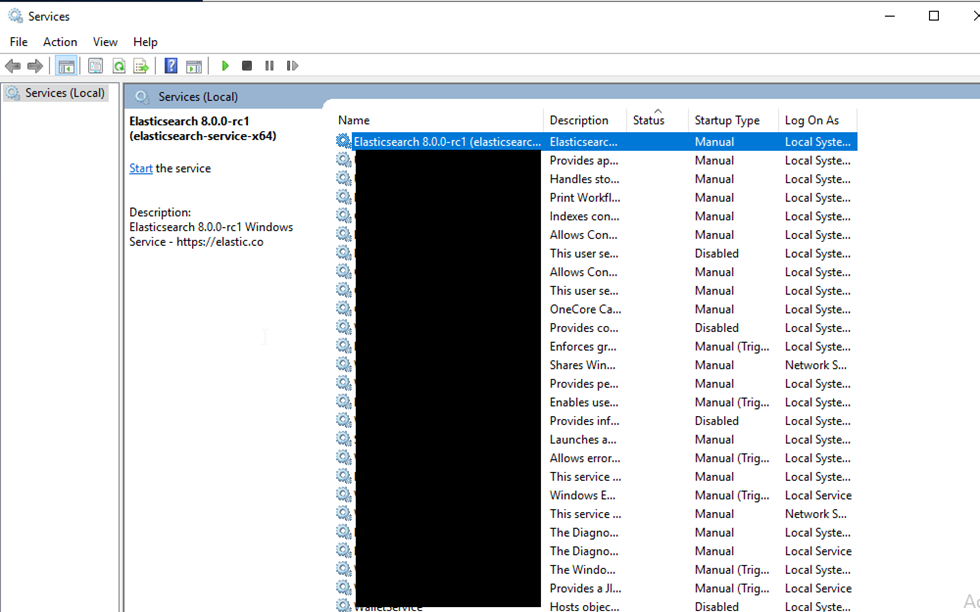
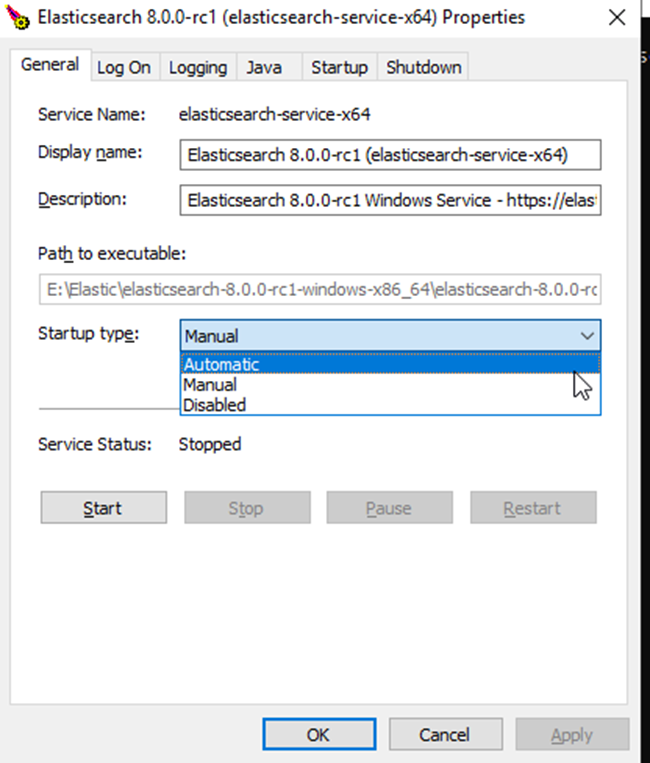
2. To make sure Elastic Search service runs every time the machine starts, go to services.

...and select the automatic startup type.
3. Apply the setting and start Your Elastic Search Service.

6. Changing the Windows Service name
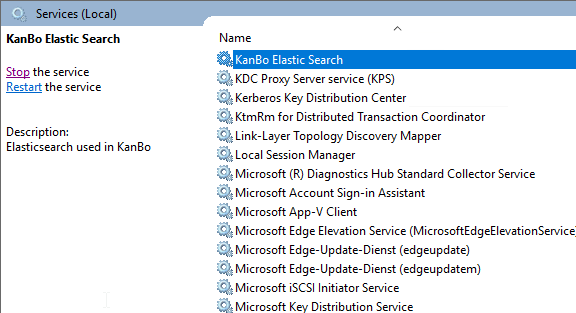
It is a good practice to change the service name of the Windows Service to something with more clarity. To change the name of our Elastic Search Windows Service:
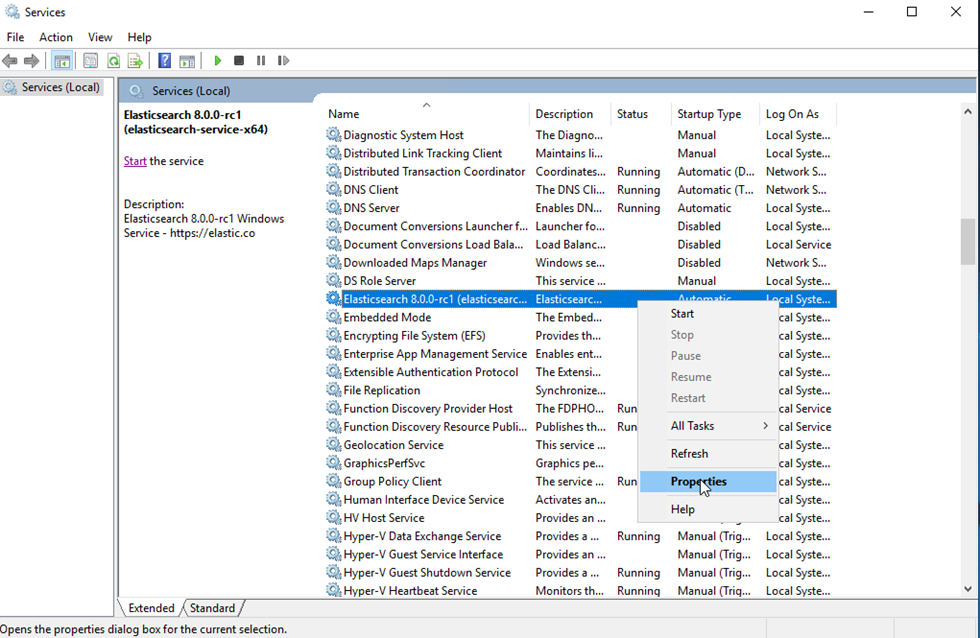
1. Right-click the Elastic Search service and go to Properties.

sc config "elasticsearch-service-x64" displayname= "KanBo Elastic Search"

sc description "elasticsearch-service-x64" "Elasticsearch used in KanBo"


7. Connecting KanBo with Elastic Search
- Go to KanBo Setup, show advanced setup and click on Elastic.
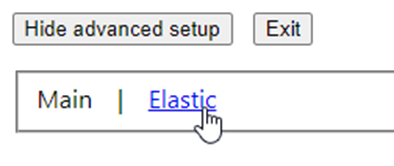
If the ”Elastic” option does not appear, restart the KanBo and try again.
- The input for the boxes in the “connection” section should be:
Url: https://YOURMACHINEIP:9200.
Replace YOURMACHINEIP with the ip address of Your Elastic Search VM reachable from the KanBo. The 9200 port is the port that Elastic search runs on. If You are running KanBo on the same machine, replace YOURMACHINEIP with “localhost”.
User: The Username from “Creating a user for KanBo”, step 8
Password: The password from “Creating a user for KanBo”, step 8
Tenant name: kanbosearch
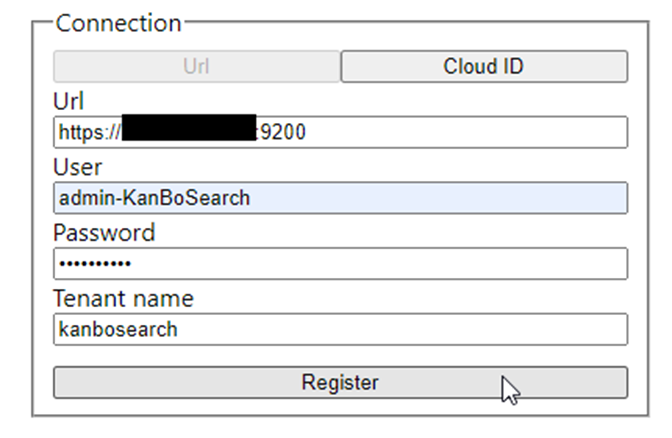
- Click on register, and Your KanBo will be connected to the Elastic Search service.
- Index all Your data by choosing “All”, in the “Data import” section, ticking the “clean” box and clicking on “Execute”.
Wait until Elastic indexed everything.
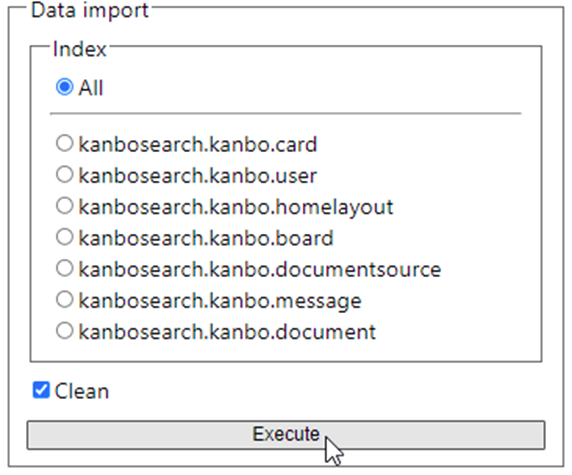
- IMPORTANT: Restart Your KanBo using IIS after the crawl (step 4) completes (stop / Start KanBo App Pool)
- Your KanBo uses Elastic Search now!
- Optional steps to test the KanBo Search: Go to KanBo, Create a Board and a card inside and click on the Zoom Glass symbol in the right upper corner and search for the name of the card. If you have Boards and cards you can search for them as well to test whether the search is working properly.
Troubleshooting
Verification required in Kibana
You are configuring Kibana and this popup appears
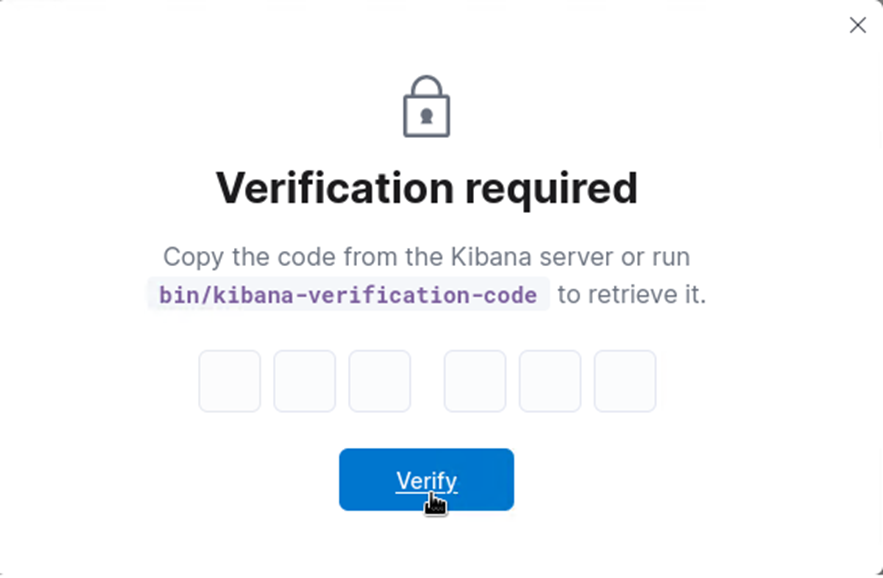
That means You opened the address without the ?code=123456 part. To verify You can type in the code from the URL present in the 3rd step of the Kibana connection process.
Failed registering elastic connection: Elastic ping failed.
This error appears whenever any of the input in the “connection” section are incorrect, (not just the URL), or if KanBo cannot connect to the specified IP. Please, make sure that:
- The url starts with https://, the machine ip is correct and is followed by “:9200” at the end.
- The Username and Password are correct
- The tenant name doesn’t include the “.*” part that was present inside the Indices of a role we have created in Kibana
- In case the Elastic Search service is not hosted on the same machine as KanBo, make sure that this URL is accessible from the KanBo machine.
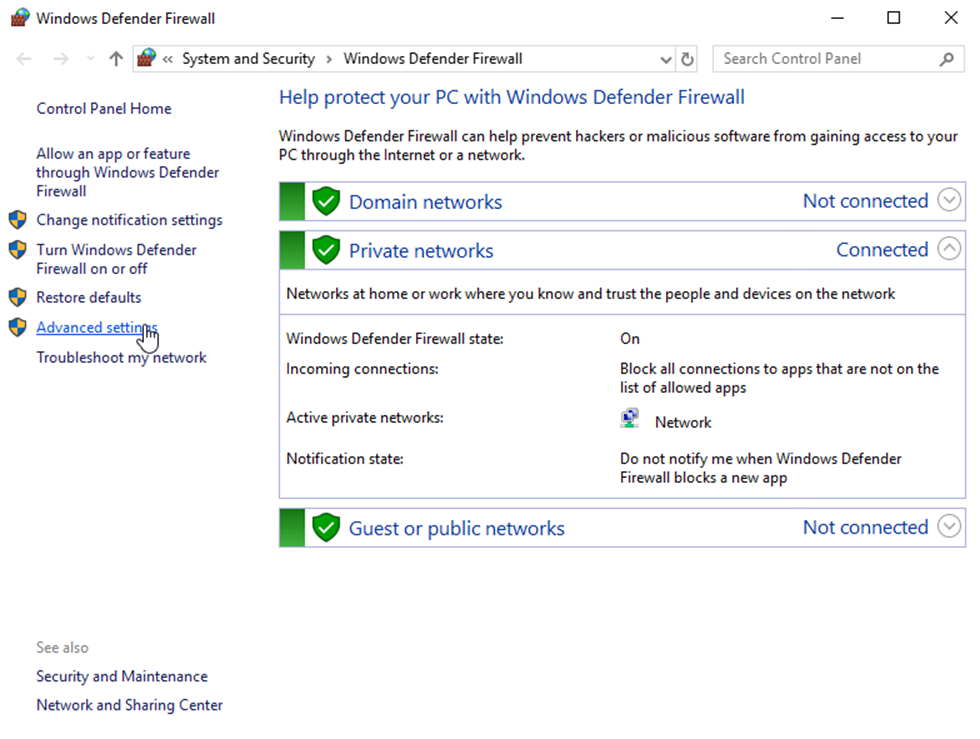
Open ports inside of the Machine
It is possible that the 9200 port is blocked by the firewall inside of the VM (and if You have a VM hosted on Azure, the port might also have not been enabled inside of the VM’s Networking setting, please refer to the article about preparing the VM on Azure). To open ports on a Windows VM:
- Go to Windows Defender Firewall > Advanced settings.
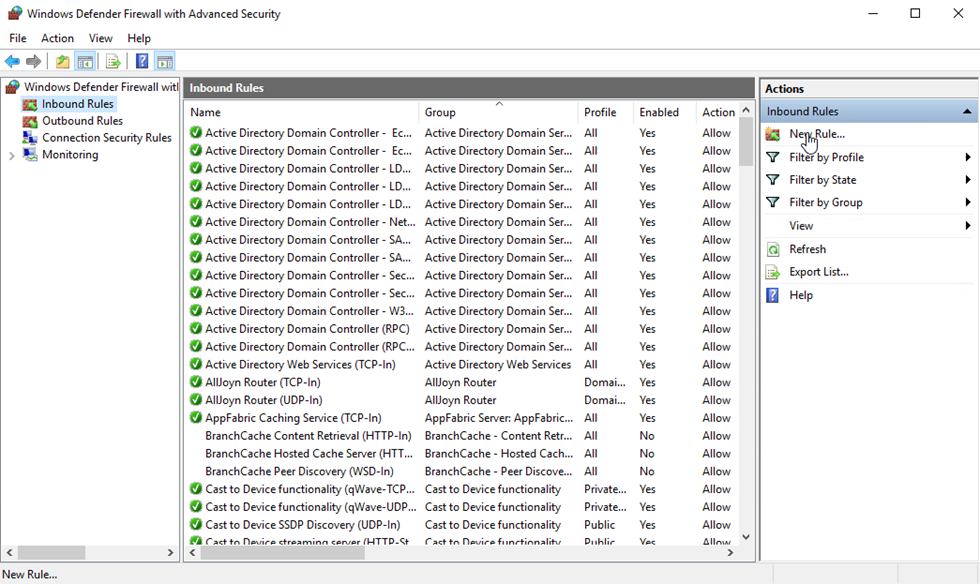
- Click on “Inbound Rules” and “New Rule”.
- Select “Port” > Next > Choose “TCP” and in “Specific local ports” type “9200”.
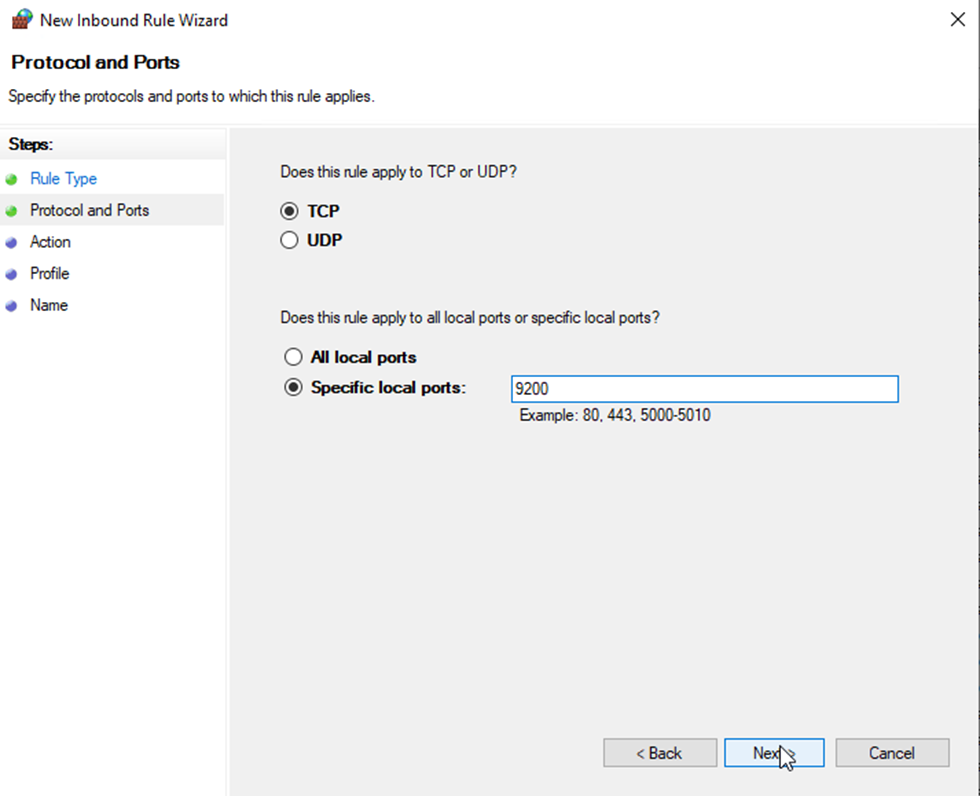
- Allow the connection.

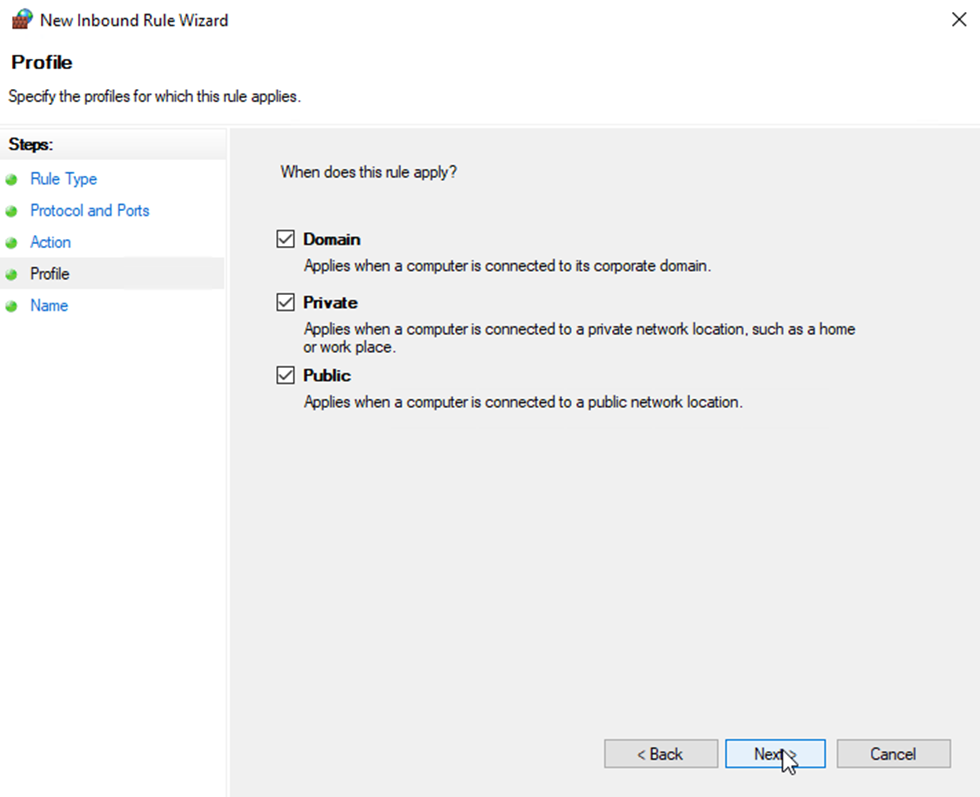
- Tick every box and click "Next".
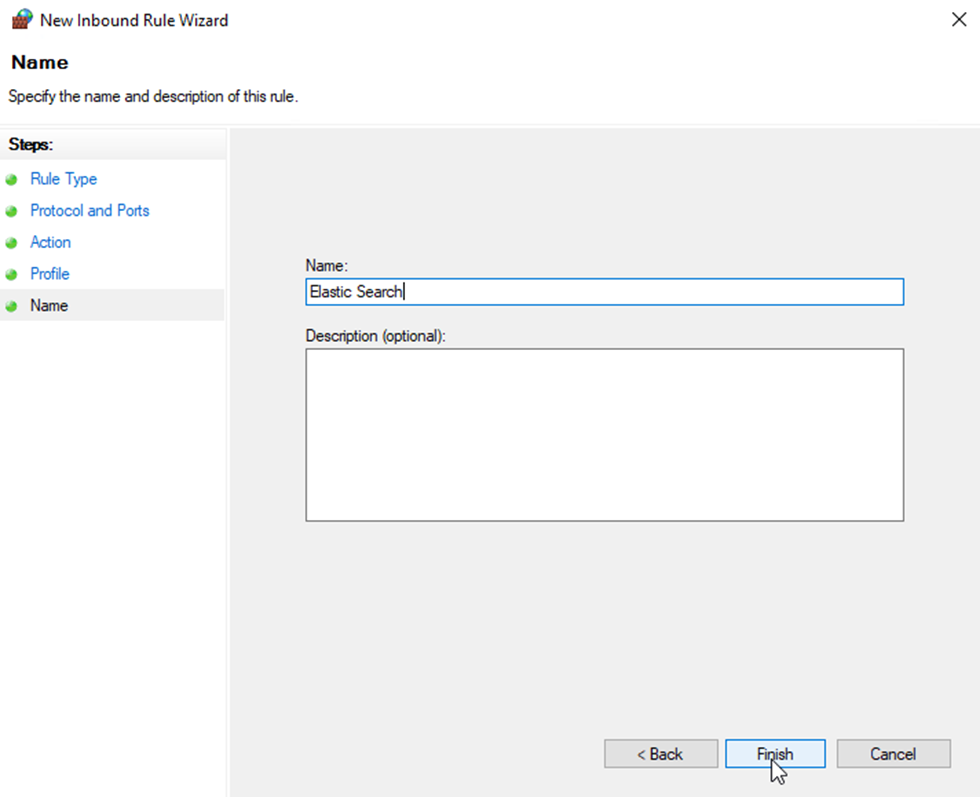
- Type in the name of the rule and click on “Finish”.
Check if the user is configured properly in Kibana
- If stopped, start Kibana and log in.
- Go to roles and click on the role You created.

- Make sure that the Cluster privileges, Run As privileges, Indices and Privileges are configured accordingly to the previous steps. Also make sure that indices end with “.*”.
- Go to Users and click on the user You created.
- Make sure that the correct role is assigned to this user.
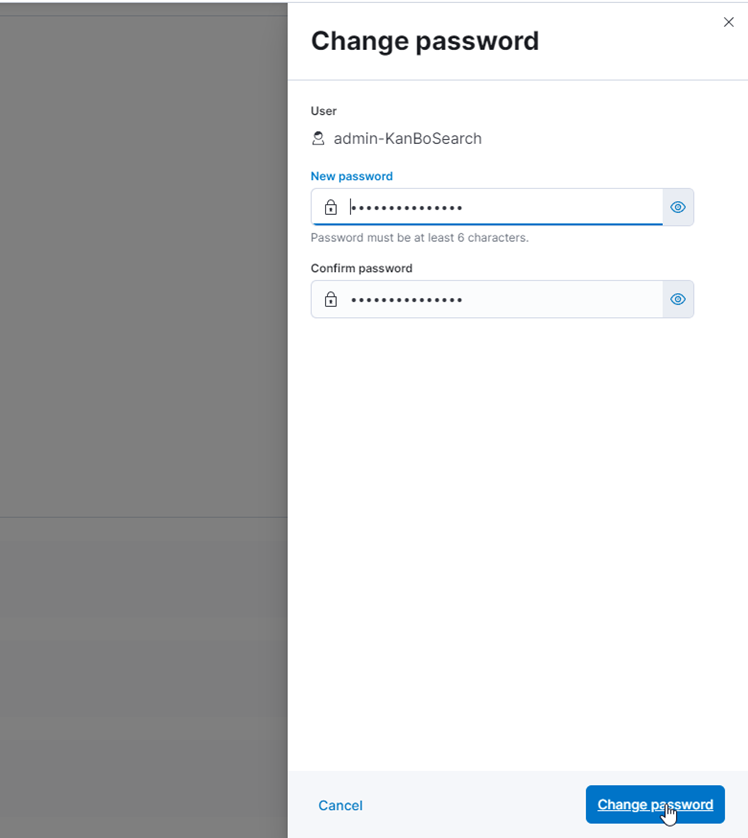
- If You are unsure about the password, You can reset it by clicking “change password”.

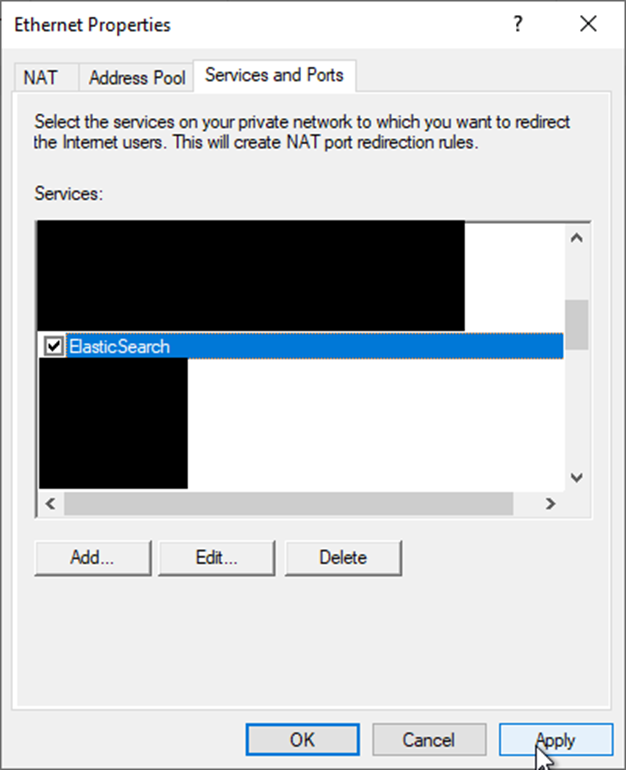
Connecting to Elastic Search hosted on a Hyper-V Virtual Machine
If You decided to host Your Elastic Search virtual machine on Hyper-V, Your host machine needs to reroute traffic to the machine’s port to a VM’s port.
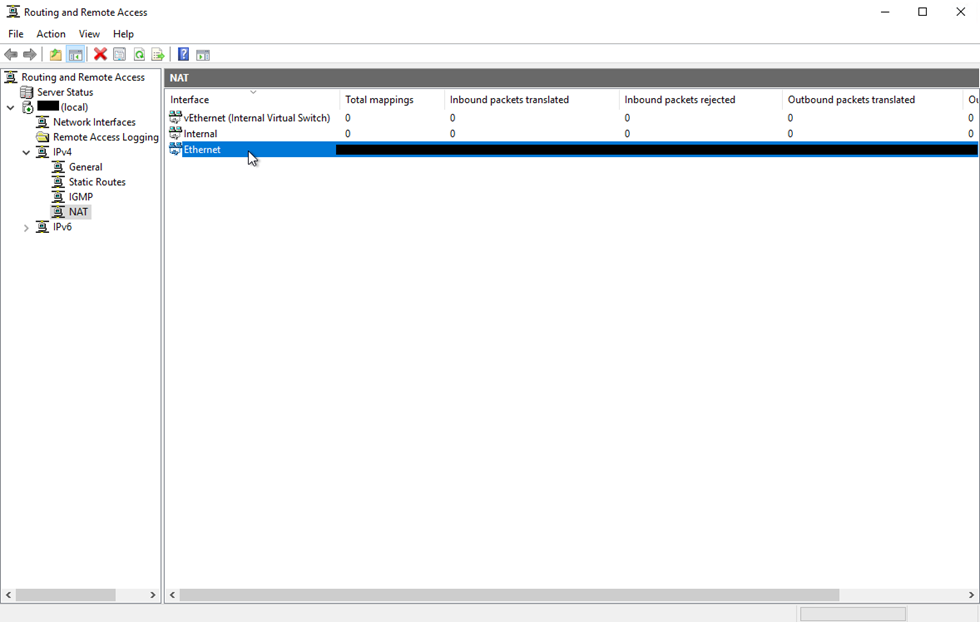
- Open Routing and Remote Access.
- Double click on “Ethernet”.
- Head to “Services and Ports” and click on “Add”.
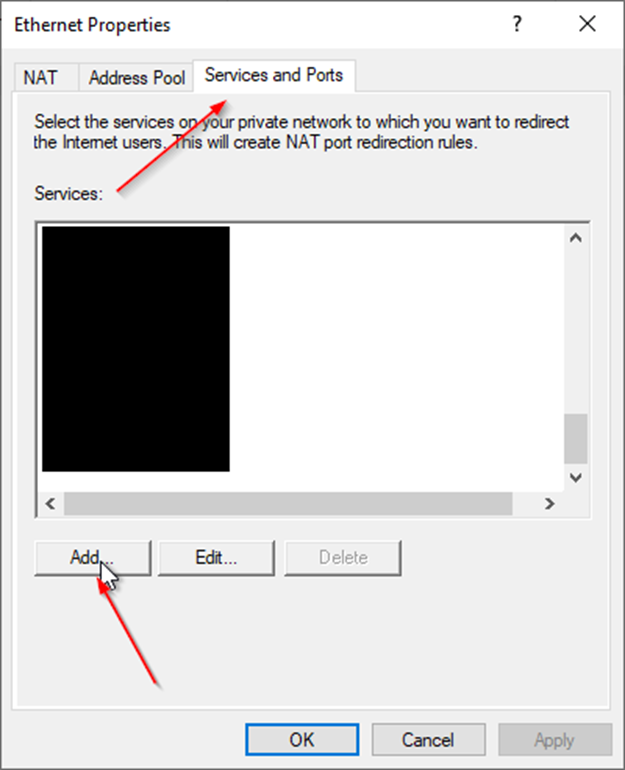
- Add a description (for example “ElasticSearch”), keep “On this interface” and “TCP” protocol selected. In incoming port, type in the port You want to use to connect to Elastic Search hosted on Your VM. In private address type in the IP address of Your VM, and in outgoing port type in 9200 (the port that Elastic Search is using) and click on OK.
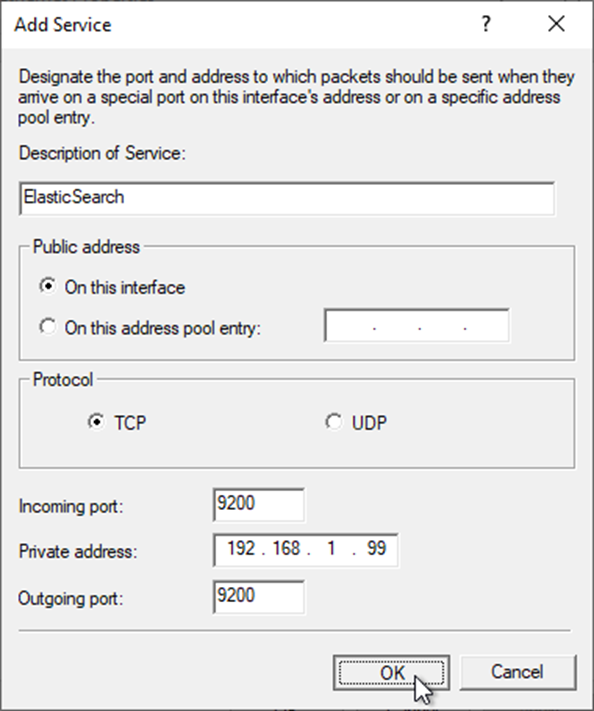
- After that is done, click on “Apply” and now You should be able to connect to Elastic Search hosted on Your Hyper-V virtual machine.