
-
Learn the Basics
-
- Cards
- Card Icons
- Card Details
- Card Statuses
- Card Users
- Card Activity Stream
- Card Status Roles
- Dates in Cards
- Reminder
- Responsible Person
- Card Blockers
- Global Card Blockers
- Card Issues
- Adding Cards to My Space
- Hinzufügen von Karten zu "MySpace"
- Removing Cards from My Space
- Entfernen von Karten aus "MySpace"
-
- Creating Cards
- Changing Card Statuses
- Following Cards
- Scheduling Cards
- Renaming Cards
- Duplicating Cards
- Quick Actions
- Mass Actions
- Copy & Paste
- Creating Card Statuses
- Changing the Default Card Status
- Changing the Order of Card Statuses
- Deleting Card Statuses
- Moving Cards between Spaces
- Archiving Cards
- Unarchiving Cards
- Deleting Cards
- Creating Card Blockers
- Managing Card Blockers
-
- Documents in KanBo
- Card Documents
- Uploading or Creating Documents in Cards
- Attaching and Detaching Documents in Cards
- Space Documents
- Document References
- Document Sources
- Downloading Documents
- Editing Documents
- Editing Documents in Browser
- Editing Documents in Office Applications
- Renaming Documents
- Deleting Documents
-
Visualize Work
-
- Space Views
- Creating Space Views
- Personal and Shared Space Views
- Card Grouping
- Filtering Cards
- Display Settings
- Work Progress Calculation
- Grouping Description
- Card Grouping Settings
- Changing the Order of Groupings
- Changing the Order of Space Views
- Deleting Space Views
- Following Card Statuses and Custom Fields
-
-
Collaborate
-
Level Up Your Work
-
Work Securely
-
Integrations
-
- Advanced KanBo Actions in Power Automate
- Creating KanBo Space Attached to Subfolder Created by Power Automate
- Creating Document Folders in Document Libraries Created by KanBo with Power Automate
- Exporting Space Views to Excel
- KanBo and Azure Logic Apps Integration
- Power Automate Integration: Triggers and Actions
- Seamless Import from Microsoft Planner to KanBo
- Synchronizing KanBo with Outlook Calendar
- Using KanBo Outlook App
-
Creating KanBo Space Attached to Subfolder Created by Power Automate
This post is also available in: Deutsch
The “Add Space” now has a new variable called “Folder path”, which allows specifying the folder that will become the Space’s default Document Source.
Here is how to automate it using Power Automate:
- Configure your “Create new folder” SharePoint action
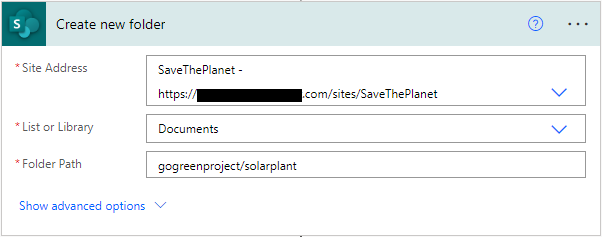
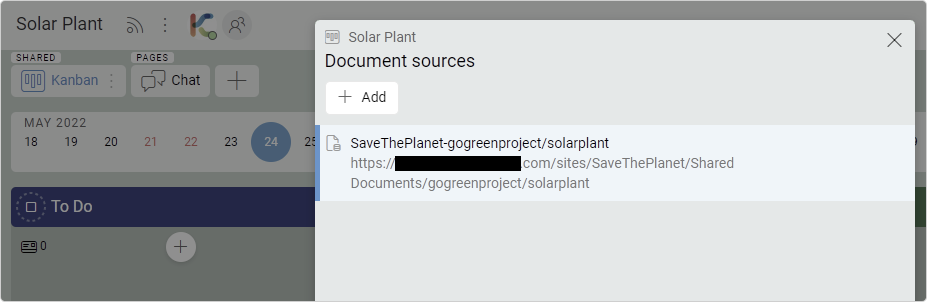
In this case, we want to create a new subfolder inside the “gogreenproject” folder called “solarplant” in a site collection with the name “SaveThePlanet”. This “solarplant” folder will become the default Document Source – the space will see only documents contained in that folder and below.
KanBo’s “Add Space” action takes in the folder path with a slash (“/”) at the beginning, which means that we will have to transform the output of the SharePoint Power Automate action.
To do that, we will need to initialize three variables.
- Initialize three variables.
First variable:
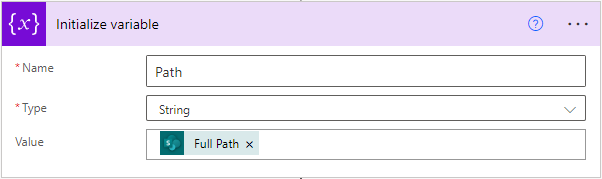
Here, we need a String variable called “Path”. We need to add dynamic content from SharePoint to the variable called “Full Path”
Second variable:

Here we will need an Integer variable called PathLength. We will need to use an expression here for value. Please copy the code excerpt below:
length(variables('Path'))Third variable:
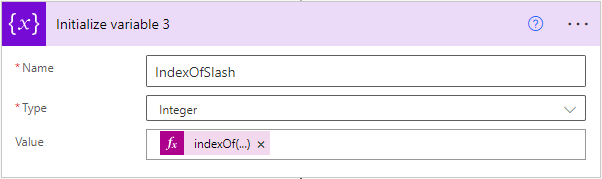
Here we will need an Integer variable, with the name “IndexOfSlash”. The expression here should be:
indexOf(variables('Path'),'/')Now you are ready for further steps.
- Configure the “Add Space” action
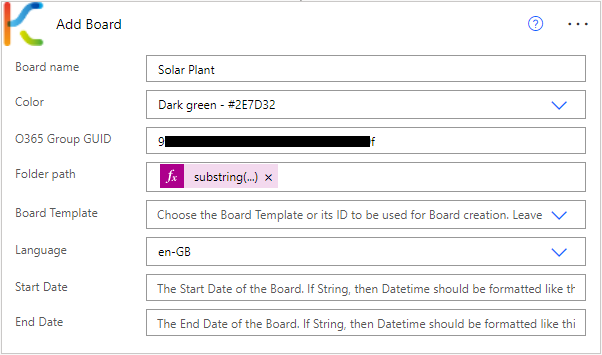
Type in the name of the space, choose the space color and the space language. These variables are up to Your personal choice.
The important variables here are the “O365 Group GUID” and the “Folder path”.
For the “O365 Group GUID”, paste the ID of the O365 Group associated with the SharePoint site collection specified in the “Create new folder” action.
For the Folder path, paste this expression (mark it and copy/paste it):
substring(variables('Path'),variables('IndexOfSlash'),sub(variables('PathLength'),variables('IndexOfSlash')))Once the Power Automate action “Add Space” is executed, you will find a new space that is attached to the subfolder of your choice.
If you set a Space Template in the parameters of the "Add Space" Power Automate action and if the space Template, you have selected has a folder structure and files included, then it will create that folder structure and files below the subfolder you have provided for the default Document Source.
Was this article helpful?
Please, contact us if you have any additional questions.